

The Process
I was inspired to try alternative and historic photographic techniques in a an introductory class from Eileen Rafferty. She offers these classes in the spring and fall. Check them out at www.eileenrafferty.com. Since then I have delved ever deeper into a variety of techniques with workshops at the Photographer’s Formulary in Condon. Not only do they supply all the chemicals necessary for these processes, they offer amazing workshops every summer with accomplished teachers. Next summer’s workshops are available at www.workshopsinmontana.com. This particular project grew out of class I took last summer from Christine Z. Anderson, a photography professor from MSU (who wrote the book on Gum Printing).
Gum produces one of a kind original prints. It is the most painterly of the alternative processes and therefore seemed like a perfect match to my Yellowstone project which was inspired by the early painters like Moran and Hill. While very labor intensive, and given the multiple opportunities to make mistakes, it is also by far the most creative and just plain fun.
Each print goes through a series of steps to achieve a full color photograph. I begin by creating 3 digital negatives for each photo, one cyan, one magenta and one yellow. Both Gum and Cyanotype are contact printing processes where the negative is placed over the emulsion coating and exposed to UV light. No need for an enlarger, or a dangerous chemical developer as they both are developed in plain water.
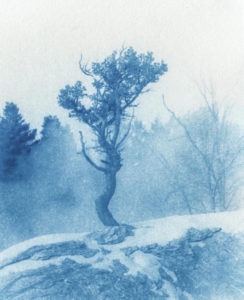
I used Cyanotype as my base blue layer. It creates a slightly sharper image and helps define the details. Cyanotype was “discovered” by English scientist John Frederick William Herscheel in 1842 and was one of the very earliest of the photographic processes. Cyanotype uses a mixture of two chemicals: ferric ammonium citrate and potassium ferricyanide. The mixture is coated on a piece of paper, an object or a negative is placed on top and it is exposed to UV light.
Now layers of color are added over the cyanotype using the gum dichromate process. Gum printing was developed in the 19th century as a way to create prints with color. By 1853 William Henry Fox took out a patent in “photoglyphy” after realizing that dichromate would harden gelatin under sunlight.
The gum layers are added to the cyanotype by brushing on a mixture of gum Arabic tinted with watercolor pigment and ammonium or potassium dichromate. The light sensitive dichromate hardens the gum Arabic in proportion to the amount of light received. The excess gum washes off in a water bath.
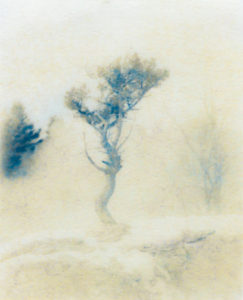
The first gum layer I added was yellow.
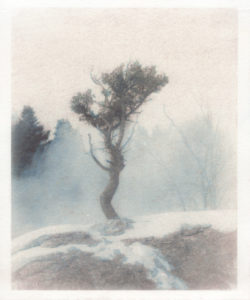
Next a layer of red is added. This creates a “full color” picture. From here a decision is made whether or not to add other layers to tweak the color, and if one wants it to reflect the original, or diverge from it. On this image I thought it needed one more layer to really make it pop and give it a more historic and painterly appearance.
I added a layer of burnt sienna, using the blue negative to get the final print. This echoed the palette of the early handpainted photographs and postcards.
Each print in the Conjuring Color portfolio was created with an individual layering of color, depending on the look that I wanted to achieve.
[ngg src=”galleries” ids=”14″ display=”basic_thumbnail”]